
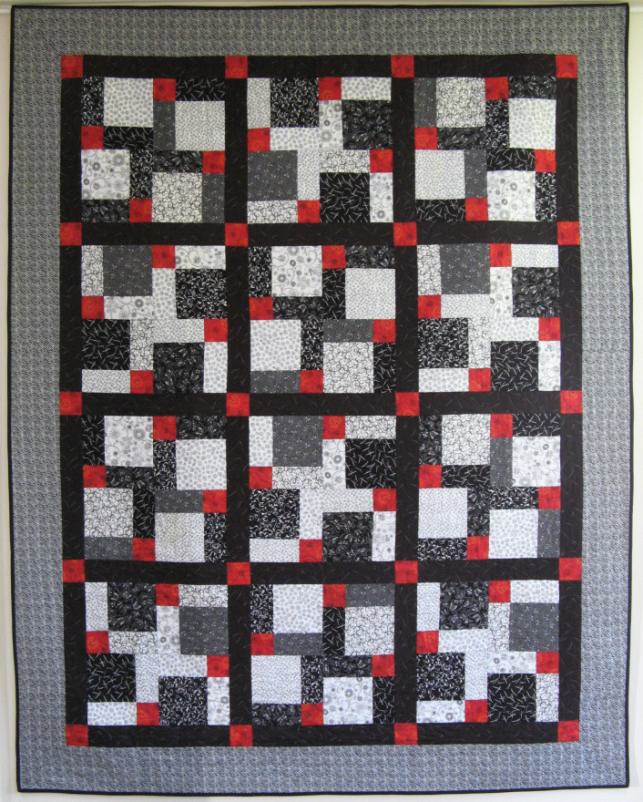
In the blog post, we are going to provide you with instructions to making a beautiful black and white quilt with a touch of red. Our very talented Sandra has sewn this quilt. Follow the steps below to make your own black, white and red quilt.
Need some fabric inspiration? Check out the categories below on our website
Step 1: Prepare your fabrics
Black & white with a touch of red
Finished Quilt 95¼” x 75¼” approx.
50cm x 8 Black & White design Fabrics (or 9 varieties of fabrics & leave out the sashing & red fabric for another different quilt)
75cm Red Fabric
1.40m Black Fabric for the sashing
1.40m Border
Cutting:
Cut 12 x 6½” squares of each of the black & white fabric
Cut 12 x 6½” squares of red fabric (centre square in diagram 1)
Cut 20“x 3¼” squares of the red fabric
Cut 31” x 3¼” x 17¾” for the sashing
Cut 8 x 6½” stripes of border fabric.
Step 2: Handy Hints
Hints: *****Always measure twice & cut once.
Read instructions very carefully before cutting out any fabric. Measure your quilt after each border is sewn on. Your measurements may vary, depending on your seam allowance and other factors. If so, adjust the pattern as required.
Step 3: First Steps for the Black & White Quilt with a Touch of Red
Instructions:
Take your squares and lay them out in batches of three (3) squares in each row.
Remember to place your main fabric (red) in the middle.
Diagram 1
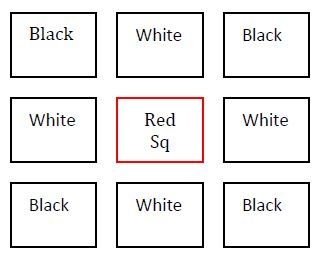
Now sew each block together startins at the top and working down, now sew each row together. Continue on until all the blocks are joined. (Swap the white & blacks around as you do each square)
Now for recutting, see diagram below
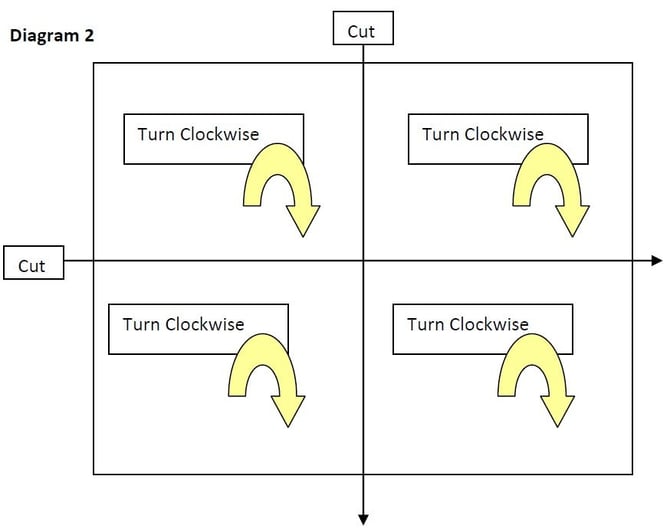
Cut down the middle of your sewn block and then across the middle the other way. This will give you four blocks, which you now need to turn clockwise once, (see arrows).
Resew these blocks together, top two (2) blocks first and then bottom two (2). Now sew these two (2) sections together.
Continue on until all blocks are sewn.
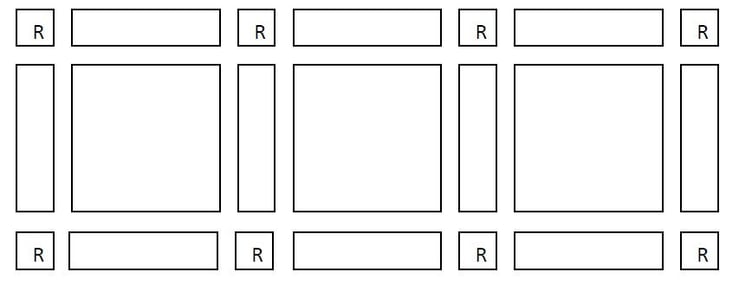
Now join your squares together with the sashing in between (See Diagram 3) for the across rows
Diagram 3 (Refer Picture of Quilt)

Sew 2 red 3¼” squares in between the 3 sashings and 1 red square at end (see Diagram 4).
Diagram 4

Diagram 5 (Refer Picture of Quilt)
Step 4: Make the Border
Border
Measure through the middle of the quilt to get correct measurement for sides which should measure 83¼”. Join 2 x 2 border fabrics, then recut each one to measure 83¼”. Sew one to each side. Now measure through the middle again to get measurements for top and bottom borders which should measure 75¼”. Join 2 x 2 border fabrics, then recut each one to measure 75¼”. Sew one to bottom and one to top of quilt.
Step 5: Now quilt as you wish
When choosing your quilt backing, consider the following points:
- Choose a superior quality backing which quilts up nicely and enhances the quilt. A cheap quality backing is not good enough to finish off your quilt because it will detriment the quilting stitches and will begin to pill over time.
- Burrangong Backing fabrics by Kennard & Kennard have a lovely even density with little to no stretch. This is very important throughout the quilting process.
- For a quilt to be comfortable, the back of a fabric needs to be smooth as well as durable, therefore a top quality backing fabric is absolutely essential.
CONCLUSION:
Thank you for reading our blog post. A Black and White quilt is easy to make, and by adding a contrasting touch of red into the patchwork design, you will create a beautiful classy quilt. How do you make your black and white quilts and what colour ideas do you use?
Using basic prints and colours can create a simple yet amazing quilt. At Kennard & Kennard, we stock a wide variety of colours and basic prints, which can be used for a large range of projects.
Congratulations! You've learnt how to make a lovelyBlack & White Quilt, with a touch of Red!


